


 Aicoco Store
 简体中文
简体中文 English (US)
The external microphone can be connected to the camera's 3.5mm port using a TRS plug (two rings).
You can use a variety of devices including wired microphones, headsets, wireless microphone receivers, sound cards, etc.
Before using, you need to turn on the external microphone in the camera settings.
After turning it on, the internal microphone will be disabled.

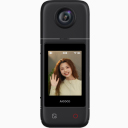
Camera Introduction
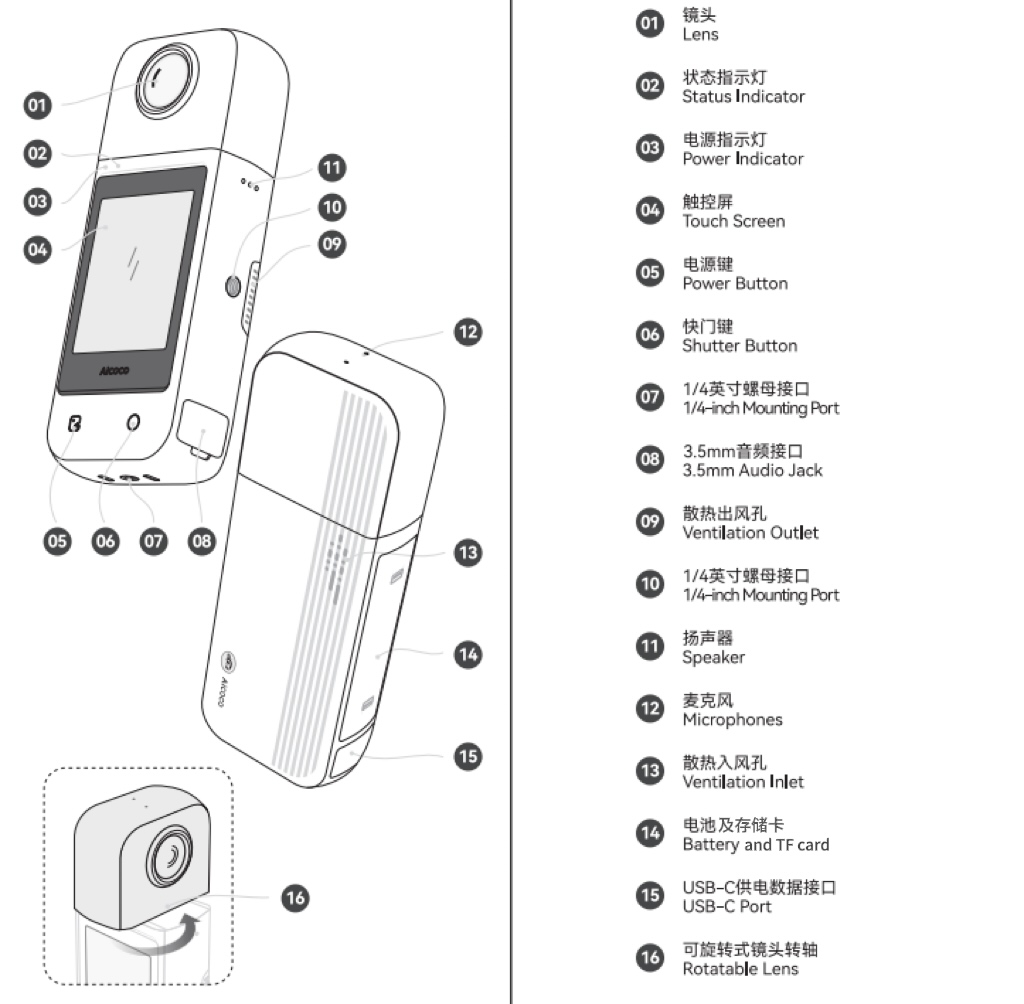
Functions introduction
- 5 Power Button: Press and hold for 2 seconds to turn the device on/off; short press in the shooting interface to switch modes.
- 6 Shutter Button: Controls the start/stop of wireless camera and video recording.
- 7-10 Standard 1/4 Screw Mount: Can be connected to tripods, selfie sticks, Gecko suction mounts, and other accessories.
- 9-13 Cooling Air Inlet/Outlet: Please do not block.
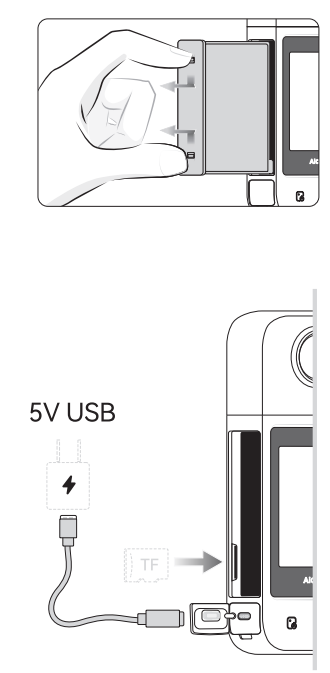
- 14 Battery and InnoDB Card: As shown in the image, press inward with two fingers to remove the battery, which will expose the TF card slot.
- 15 Charging: Please use a 5V Type-C charging cable.
- 16 Lens Rotation: The lens can rotate 180° as shown in the image.
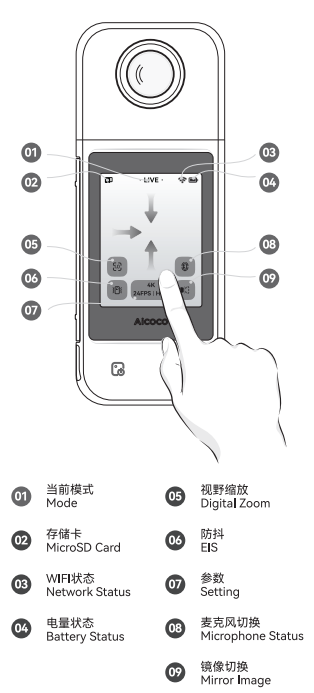
Camera Touchscreen Operation
Users can configure the camera settings and view the local gallery through the camera's touch screen.
· Swipe up from the bottom: Opens the settings page.
· Swipe down from the top: Allows mode selection.
· Swipe right from the left side: Opens the local gallery.
The main interface functions are shown in the image below.
- Connect the camera, authorize the app to use Bluetooth, and enter the setup guide page after a successful connection.
Basic App Function Interface:
1. Pair New Device 2. Modify Device Name/Delete Device/Firmware Update 3. Storage Card Capacity (based on current video settings) 4. Wi-Fi Connection 5. Battery Level 6. Zoom Settings 7. Resolution, Frame Rate, Bit Rate Settings 8. Microphone Direction Selection 9. Live Mode - Click to enter live streaming setup 10. Wireless Camera Mode - Click to automatically start wireless camera function 11. USB Camera Mode 12.Recording Mode - Click to start recording 13. Local Gallery 14. Real-time Low-Resolution Preview 15. Camera and System Settings |  |
Camera Settings
Swipe up from the bottom of the camera's touch screen to bring up the settings page, or connect the camera to your phone via Bluetooth and adjust the settings through the app.
Setting Introduction
- - Image Settings
- · HDR: Turn on in bright outdoor lighting; not recommended for normal indoor lighting conditions.
- · Stabilization: Cannot be enabled at the same time as HDR.
- · Metering Mode: Choose "Average Metering" for landscapes; "Center Metering" for shots with a clear subject; if unsure, select "Center-Weighted Average Metering."
· Exposure, ISO, and Shutter: Keep at 0 and Auto unless special circumstances require adjustments.
- - Audio Settings
· External Mic: When enabled, an external microphone will work, and the internal microphone will be disabled.
- - General Settings
- · Orientation: Switch between portrait and landscape modes. For landscape shooting, select 16:9. If you don't adjust the aspect ratio, the footage and system UI will remain in portrait mode even when the camera is turned sideways.
- · Grid: Composition assist lines.
Settings Introducion
- - Region Standard: If you notice flickering lights during shooting, you need to adjust the standard according to the regional power frequency.
- · PAL: Frame rate of 25/50fps, generally used in Asia, Europe, and other regions.
· NTSC: Frame rate of 30/60fps, generally used in North America.
- - Video Encoding
- · H.264: More compatibility, supported by almost all platforms and players.
· H.265: Offers clearer and smoother video, but some platforms or devices may not be compatible.
- Backup Mode
· Loop: When the storage card is full, new footage will overwrite old footage. Suitable for long-term live streaming but may overwrite important footage.
· Non-Loop: Recording will stop automatically when the storage card is full.
- · Off: No recording during live streaming.
- - Language
Sets the language of the camera. To set the language for the mobile app, go to the “My” page.
- - Format Storage Card
This will erase the storage card, so please back up your content in advance.
- Follow the beginner's guide: tap the WiFi icon to enter the WiFi settings page, turn on the camera's WiFi switch, select the desired WiFi network, and enter the password to connect. The "Refresh" button in the top-right corner can quickly refresh the network list.
- If you still cannot find the desired WiFi network, tap the blue text at the bottom of the list that says "Can't find WiFi? Click here to restart the camera network" to perform a new search.
- If the target WiFi still cannot be found, please check if the WiFi network is a password-free and unsecured network.
When first insert the storage card or if it has been used in other devices, the system may prompt that the storage card is not recognized. You will need to go to the settings page to format the card.
After connecting the camera, if there is a new firmware version available, a pop-up will prompt you to upgrade the firmware.
Firmware Upgrade Requirements:
- - The SD card must be functioning properly and have at least 100MB of free space.
- - The camera and phone must be on the same WiFi network.
- The camera must have a battery inserted with more than 20% charge.
If the conditions are not met or if you prefer to update later, you can click the "···" icon on the home page to find the manual update button.
Here are the steps to use the Aicoco Live App for live streaming:
- Install the Aicoco Live App and ensure that Bluetooth and Wi-Fi are enabled on your phone. Press and hold the camera's power button for 2 seconds to turn it on.
- Open the Aicoco Live App. On your first entry, click "Connect My Device" on the page, or tap the icon in the top left corner to enter Bluetooth search and add the device.
- Search for the onAir Bluetooth signal and tap the name of the onAir device (the default camera device name is "onAir *", where * represents the last 6 digits of the camera’s name, which can be viewed in the camera settings). Tap "Connect My Device" and then "Complete" to bind your phone to the camera.
- For first-time live streaming or using the wireless camera, you need to connect the device to Wi-Fi. Open the app, tap the Wi-Fi section in the device information bar to connect. Wait for the Wi-Fi search results, turn on the wireless Wi-Fi switch, add the Wi-Fi network from the list, and enter the password to connect.
- In the app, tap the "Live" icon (or switch the camera to "Live" mode) to enter the app's live streaming settings.
-

Meet Aicoco
Learn more -

Using Feedback
Learn more -

Contact Us
Learn more


